This page is a simple guide to help you write (or more correctly, type) Urdu on your computer. (You might as well want to read a similar page about correctly viewing Urdu.)
Please let me know if something is incorrect or needs more explanation by leaving a comment below.
Urdu is a language that is written right-to-left, in contrast with most other languages, such as English, that are written left-to-right. Computers need to differentiate between these two directions in order to render and input the respective text correctly. Thus, your operating system needs to have some sort of support built into itself for right-to-left languages.
After this right-to-left support, you need to tell your operating system that you intend to write in Urdu. In usual cases, whenever you press the ‘S’ key, an ‘s’ or ‘S’ appears on the screen. Fair enough. However, when your are typing some text in Urdu, your computer needs to know that when you press the ‘S’ key, you actually mean a ‘س‘ (just an example). For this purpose, what you need is a keyboard layout that will take care of all these key-meaning associations.
So let’s get our hands dirty, shall we? Just click on the name of your operating system: Microsoft Windows XP, or Microsoft Windows 7.
First, go to Control Panel. (Click on Start, then Settings, and then Control Panel. Or if you are not using the Classic Start Menu, then simply Start > Control Panel.)
Next, enter Regional and Language Options.
First, click on this link to go to the keyboard layout’s page on CRULP’s website, and download it. Unzip the zip file and run setup.exe. It will display a success message after installation.
Now, visit Regional and Language Options (in the Control Panel) again. Go again in the Languages tab, and click the button that says “Details…”

Next, switch to UR in the Language Bar. Now hit these keys: P – A – K – S – T – A – N. You should see پاکستان written in the WordPad window.
Tada! You’re done!

You can now write Urdu in almost any software (but not all) that lets you type and supports Unicode. (Unicode is a standard for representing and manipulating text from different writing systems of the world.)
Typing in Urdu can be a little awkward at first, but it can also become enjoyable with some practice. Some tips are below:
One of them is the Urdu OpenPad. It is written in Javascript and runs in your web browser, so there’s no need for installation or any other related jazz. If all you want is to write small snippets in Urdu and then copy & paste them to some other place, then OpenPad is perfect for the job.
Another alternative is Google Transliteration. This nifty tool lets you type in Roman Urdu, and automagically converts it into proper Urdu. For example, if you type “naam” (followed by a space), it will be converted into “نام”. Keep on typing and each word you type will be converted after you type space or other punctuation.
First thing first, then. These tags (described below) do not magically enable your keyboard for typing Urdu. You need to have an Urdu keyboard layout installed in your operating system for that. If this is not the case, or if you don’t understand what I am talking about, then please go to the top of this page and start reading from there.
So you have an Urdu keyboard layout installed in your computer, or you have some other method of typing Urdu at your service, and you want to leave a comment on this blog in Urdu. So what do these tags do? They make sure that the Urdu you will type gets displayed in the correct markup and with appropriate styling, so that there is no problem in reading it.
Here we go then.
Please let me know if something is incorrect or needs more explanation by leaving a comment below.
A little theory first
Don’t worry. I’ll try to be as less boring as possible.Urdu is a language that is written right-to-left, in contrast with most other languages, such as English, that are written left-to-right. Computers need to differentiate between these two directions in order to render and input the respective text correctly. Thus, your operating system needs to have some sort of support built into itself for right-to-left languages.
After this right-to-left support, you need to tell your operating system that you intend to write in Urdu. In usual cases, whenever you press the ‘S’ key, an ‘s’ or ‘S’ appears on the screen. Fair enough. However, when your are typing some text in Urdu, your computer needs to know that when you press the ‘S’ key, you actually mean a ‘س‘ (just an example). For this purpose, what you need is a keyboard layout that will take care of all these key-meaning associations.
So let’s get our hands dirty, shall we? Just click on the name of your operating system: Microsoft Windows XP, or Microsoft Windows 7.
Microsoft Windows XP
Please note that the screenshots provided may differ from your computer’s desktop environment/theme.Step 1: Right-to-left support
You will need the Windows XP Installation CD (or an alternative installation source) for this step.First, go to Control Panel. (Click on Start, then Settings, and then Control Panel. Or if you are not using the Classic Start Menu, then simply Start > Control Panel.)
Next, enter Regional and Language Options.
However, if your computer’s Control Panel displays the Category View, then click Date, Time, Language, and Regional Options and then Regional and Language Options.
A dialog box titled “Regional and Language Options” will appear. Click on its Languages tab.
Check the option that says “Install files for complex script and right-to-left languages (including Thai)“. (If you are like me, you’ll wonder what so special is about Thai. Short explanation: Thai language requires special rules for word breaking and warping. Long explanation: No idea!)
Click OK. You’ll be prompted to insert the Windows XP installation CD, after which Windows will do some magic.
That’s it. Your computer now supports right-to-left languages. Simple, huh?Step 2: Installing the keyboard layout
There are several Urdu keyboard layouts available; however, my personal favourite is CRULP Urdu Phonetic Keyboard Layout, released by Center for Research in Urdu Language Processing (CRULP). Even though the instructions below are for installing this phonetic keyboad layout, installing other keyboard layouts is similar and shouldn’t be difficult.First, click on this link to go to the keyboard layout’s page on CRULP’s website, and download it. Unzip the zip file and run setup.exe. It will display a success message after installation.
Now, visit Regional and Language Options (in the Control Panel) again. Go again in the Languages tab, and click the button that says “Details…”
A new dialog box titled “Text Services and Input Languages” will appear, showing a list of installed keyboard layouts. Since you need to add into this list the Urdu keyboard layout that you just installed, click the button that says “Add…“.
Another dialog box titled “Add Input language” will appear. Select “Urdu” for “Input language”, and “CRULP Urdu Phonetic v1.1” for “Keyboard layout/IME”.
Click OK. The Urdu keyboard layout should now appear in the list.
Now that was pretty simple too, wasn’t it?
Step 3: Test
After the keyboard layout is added succesfully, you should also start seeing the Language Bar somewhere on the Desktop (or on top of the current window), as shown below. The appearance of the Language Bar may differ (and you can customize it later), but the tiny blue icon which says EN is all that matters right now. This is telling you that if you type anything right now, it will be interpreted as English by your operating system.If you click the EN icon, something like below will appear. Select “UR Urdu” and the blue icon will change itself from EN to UR. As long as the Language Bar shows this UR, everything you type will be in Urdu. To switch back to English, click the UR and change it to EN. Plain and simple.
Now, for the testing part.
Open WordPad (Start > (All) Programs > Accessories > WordPad). Change the font to any Urdu font that you have installed, or if there is none, change it to Tahoma. Increase the font size as well, just for the sake of clarity (12–14 points will be fine).Next, switch to UR in the Language Bar. Now hit these keys: P – A – K – S – T – A – N. You should see پاکستان written in the WordPad window.
(Skip the instructions for Windows 7.)
Microsoft Windows 7
Windows 7 comes with inbuilt right-to-left languages support (hurray!). So all you need to do is to install an Urdu keyboard layout. Here we go:Step 1: Installing the keyboard layout
There are several Urdu keyboard layouts available; however, my personal favourite is CRULP Urdu Phonetic Keyboard Layout, released by Center for Research in Urdu Language Processing (CRULP). To get your hands on this keyboard layout, just click on this link to go to the keyboard layout’s page on CRULP’s website, and download it. Unzip the zip file and run setup.exe. It will display a success message after installation.Tada! You’re done!
Step 2: Test
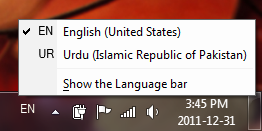
After the keyboard layout has been installed, you should see the Language Bar on the bottom right corner besides the cute little icons, as shown in the image below. By default, the Language Bar will show “EN”, which means that if you type anything right now, it will be interpreted as English by your operating system.If you click the EN icon, something like below will appear. Select “UR Urdu (Islamic Republic of Pakistan)” and the icon will change itself from EN to UR. As long as the Language Bar shows this UR, everything you type will be in Urdu. To switch back to English, click the UR and change it to EN. Plain and simple.
For testing, open WordPad (Start > All Programs > Accessories > WordPad). Change the font to any Urdu font that you have installed, or if there is none, change it to Tahoma. Increase the font size as well, just for the sake of clarity (12–14 points will be fine).
Next, switch to UR in the Language Bar. Now hit these keys: P – A – K – S – T – A – N. You should see پاکستان written in the WordPad window.Practice, practice, practice!
Congratulations!You can now write Urdu in almost any software (but not all) that lets you type and supports Unicode. (Unicode is a standard for representing and manipulating text from different writing systems of the world.)
Typing in Urdu can be a little awkward at first, but it can also become enjoyable with some practice. Some tips are below:
- On the download page for CRULP Urdu Phonetic Keyboard Layout, there is also a link that says “Release Notes”. It’s a PDF file with information on the keyboard layout, but more importantly, it contains the mappings of Urdu alphabets for the keys of your computer’s keyboard. Use it as a reference whenever you can’t find any Urdu alphabet on the keyboard.
- Use a better Unicode text editor for creating and editing your Urdu text files. I recommend using BabelPad. It lets you select keyboard layouts through its own interface, so you don’t need to go to the Language Bar, and it also has several tools for working with Unicode and Unicode fonts.
- If you want to create fully formatted documents in Urdu, you can do so by using Microsoft Word, or OpenOffice.org Writer, or any other word processor. Please refer to the respective help files of your word processor for specifying the right-to-left direction and other issues. (They are not much difficult, so you shouldn’t have any problem.)
Alternatives
If you don’t want to install the keyboard layout for some reason, there are other methods for typing in Urdu.One of them is the Urdu OpenPad. It is written in Javascript and runs in your web browser, so there’s no need for installation or any other related jazz. If all you want is to write small snippets in Urdu and then copy & paste them to some other place, then OpenPad is perfect for the job.
Another alternative is Google Transliteration. This nifty tool lets you type in Roman Urdu, and automagically converts it into proper Urdu. For example, if you type “naam” (followed by a space), it will be converted into “نام”. Keep on typing and each word you type will be converted after you type space or other punctuation.
Writing Urdu on this blog
The only place in this blog where you would want to write Urdu is the comment box, and chances are that you have arrived here after following the link that promises more information about some mysterious tags.First thing first, then. These tags (described below) do not magically enable your keyboard for typing Urdu. You need to have an Urdu keyboard layout installed in your operating system for that. If this is not the case, or if you don’t understand what I am talking about, then please go to the top of this page and start reading from there.
So you have an Urdu keyboard layout installed in your computer, or you have some other method of typing Urdu at your service, and you want to leave a comment on this blog in Urdu. So what do these tags do? They make sure that the Urdu you will type gets displayed in the correct markup and with appropriate styling, so that there is no problem in reading it.
Here we go then.
Tidak ada komentar:
Posting Komentar